Create an Overlay Network in Ubuntu using Open vSwitch (OVS)
By creating an overlay network, you can have a new interface attached to your system with any arbitrary IP that you would like. You can also join other machines to this network and have connectivity between all of them using the overlay IPs. OVS is a multilayer virtual switch designed to enable massive network automation through programmatic extension. To create an overlay network, we need to create an internal interface. The internal interface is used because you may lose your connectivity when trying to build a bridge and connect your physical interfaces to it; since they would not get an IP (switches work in layer 2). Instead, the internal interface obtains an IP address, and the host would be accessible. Here, we create an overlay network between three VMs running on Virtual Box.
Getting Started
Install Open vSwitch
To install Open vSwitch please check their page. Alternatively, you can install ovs using apt-get in ubuntu by:
ubuntu@VM1:~$ sudo apt-get install openvswitch-switch openvswitch-commonIn an overlay network created by Openvswitch, all packets are encapsulated in UDP packets associated with the port 4789. So please ensure this port is accessible.
Create a bridge and interfaces
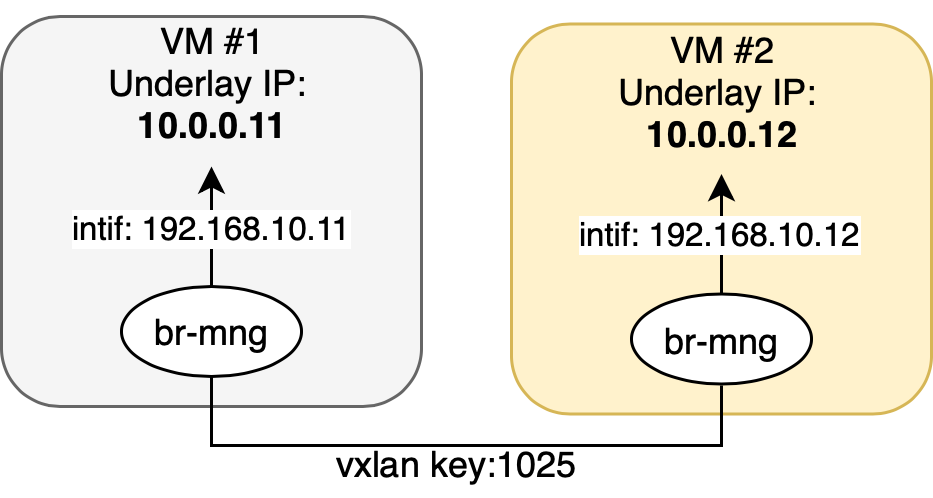
Here, we create a bridge named br-mng. An internal interface named intif and an interface of type vxlan are also created. Vxlan interface is used for point to point communication between two hosts. So the same key should be used for both hosts on each side of the connection. It should be noted that the MTU of the internal interface (intif) should be set to 1450. Since packets are encapsulated in UDP packets and the size of the payload is matter. There is a nice explanation here. Then we have:
ubuntu@VM1:~$ sudo ovs-vsctl add-br br-mng
ubuntu@VM1:~$ sudo ovs-vsctl add-port br-mng intif -- set interface intif type=internal
ubuntu@VM1:~$ sudo ovs-vsctl add-port br-mng vxlan1 -- set interface vxlan1 type=vxlan \
                   options:remote_ip=10.0.0.12 options:key=1025
ubuntu@VM1:~$ sudo ifconfig intif 192.168.10.11/24 mtu 1450 up
And in VM #2 we have the same things. However, the underlay and overlay IP are changed correspondingly, but the key remains the same.
ubuntu@VM1:~$ sudo ovs-vsctl add-br br-mng
ubuntu@VM1:~$ sudo ovs-vsctl add-port br-mng intif -- set interface intif type=internal
ubuntu@VM1:~$ sudo ovs-vsctl add-port br-mng vxlan1 -- set interface vxlan1 type=vxlan \
                   options:remote_ip=10.0.0.11 options:key=1025
ubuntu@VM1:~$ sudo ifconfig intif 192.168.10.12/24 mtu 1450 up
Test the Connectivity
To ensure having proper connectivity, let’s see the status of interfaces of your VMs. We should have the overlay IP that we chose before and MTU of 1450 for intif.
ubuntu@VM1:~$ ifconfig
eth0: flags=4163<UP,BROADCAST,RUNNING,MULTICAST>  mtu 1500
  inet 10.0.0.11 netmask 255.255.255.0  broadcast 10.0.0.255
  .
  .
  .
intif: flags=4163<UP,BROADCAST,RUNNING,MULTICAST>  mtu 1450
  inet 192.168.10.11 netmask 255.255.255.0  broadcast 192.168.10.255
  .
  .
  .
We can also use iperf3 which is a tool for active measurements of the maximum achievable bandwidth. On VM #1 with overlay IP of 192.168.10.11 execute:
ubuntu@VM1:~$ iperf3 -sand on the VM #2 with overlay IP of 192.168.10.12:
ubuntu@VM1:~$ iperf3 -c 192.168.10.11Then you should see the following output:
ubuntu@VM2:~$ iperf3 -c 192.168.10.11
Connecting to host 192.168.10.11, port 5201
[  4] local 192.168.10.12 port 33092 connected to 192.168.10.11 port 5201
[ ID] Interval           Transfer     Bandwidth       Retr  Cwnd
[  4]   0.00-1.00   sec   102 MBytes   858 Mbits/sec    0   2.09 MBytes
[  4]   1.00-2.00   sec   118 MBytes   992 Mbits/sec    0   2.33 MBytes
[  4]   2.00-3.00   sec   121 MBytes  1.01 Gbits/sec    0   2.78 MBytes
[  4]   3.00-4.00   sec   119 MBytes   996 Mbits/sec  166   1.97 MBytes
[  4]   4.00-5.00   sec   114 MBytes   957 Mbits/sec    0   1.97 MBytes
[  4]   5.00-6.00   sec   116 MBytes   974 Mbits/sec    0   2.39 MBytes
[  4]   6.00-7.00   sec   108 MBytes   902 Mbits/sec  680   1.71 MBytes
[  4]   7.00-8.00   sec   126 MBytes  1.06 Gbits/sec    0   1.82 MBytes
[  4]   8.00-9.00   sec   128 MBytes  1.07 Gbits/sec    0   1.90 MBytes
[  4]   9.00-10.00  sec   117 MBytes   980 Mbits/sec    0   1.93 MBytes
- - - - - - - - - - - - - - - - - - - - - - - - -
[ ID] Interval           Transfer     Bandwidth       Retr
[  4]   0.00-10.00  sec  1.14 GBytes   980 Mbits/sec  846             sender
[  4]   0.00-10.00  sec  1.14 GBytes   977 Mbits/sec                  receiver

iperf Done.
If you see the transfer rate of 0 Byte, most likely there is a problem with the configured MTU of your interfaces.
Want to read more?
Check out these pages:- Kubebuilder Admission Webhook for Core Types
- Kubernetes Object Configuration with Kustomize
- A Guide to CA, CSR, CRT, and Keys (Digital Certificates)
- Deploy a Local Kubernetes Webhook Server
- Linux iptables Reference Guide with Examples
- Configuring sFlow on Dell Switch with OS9
- Configuring WebDAV Access for Zotero on Ubuntu
- Dell Switch Configuration Commands
- Route Traffic through a Private Network using Dynamic Port Forwarding and Proxy SwitchyOmega
- Access to the SAVI using CLI
- Connect to Existing Running Desktop Session using x11vnc
- Install Ubuntu 20.04 via PXE UEFI Setup
- Access to the SAVI using Web Portal
- Run PyCharm IDE over SSH using Remote Host Interpreter
- Reverse SSH to Access Hosts Behind the NAT
- VNC Server in Ubuntu 16.04, 18.04 and CentOS 7