A Guide to CA, CSR, CRT, and Keys (Digital Certificates)
Getting Started
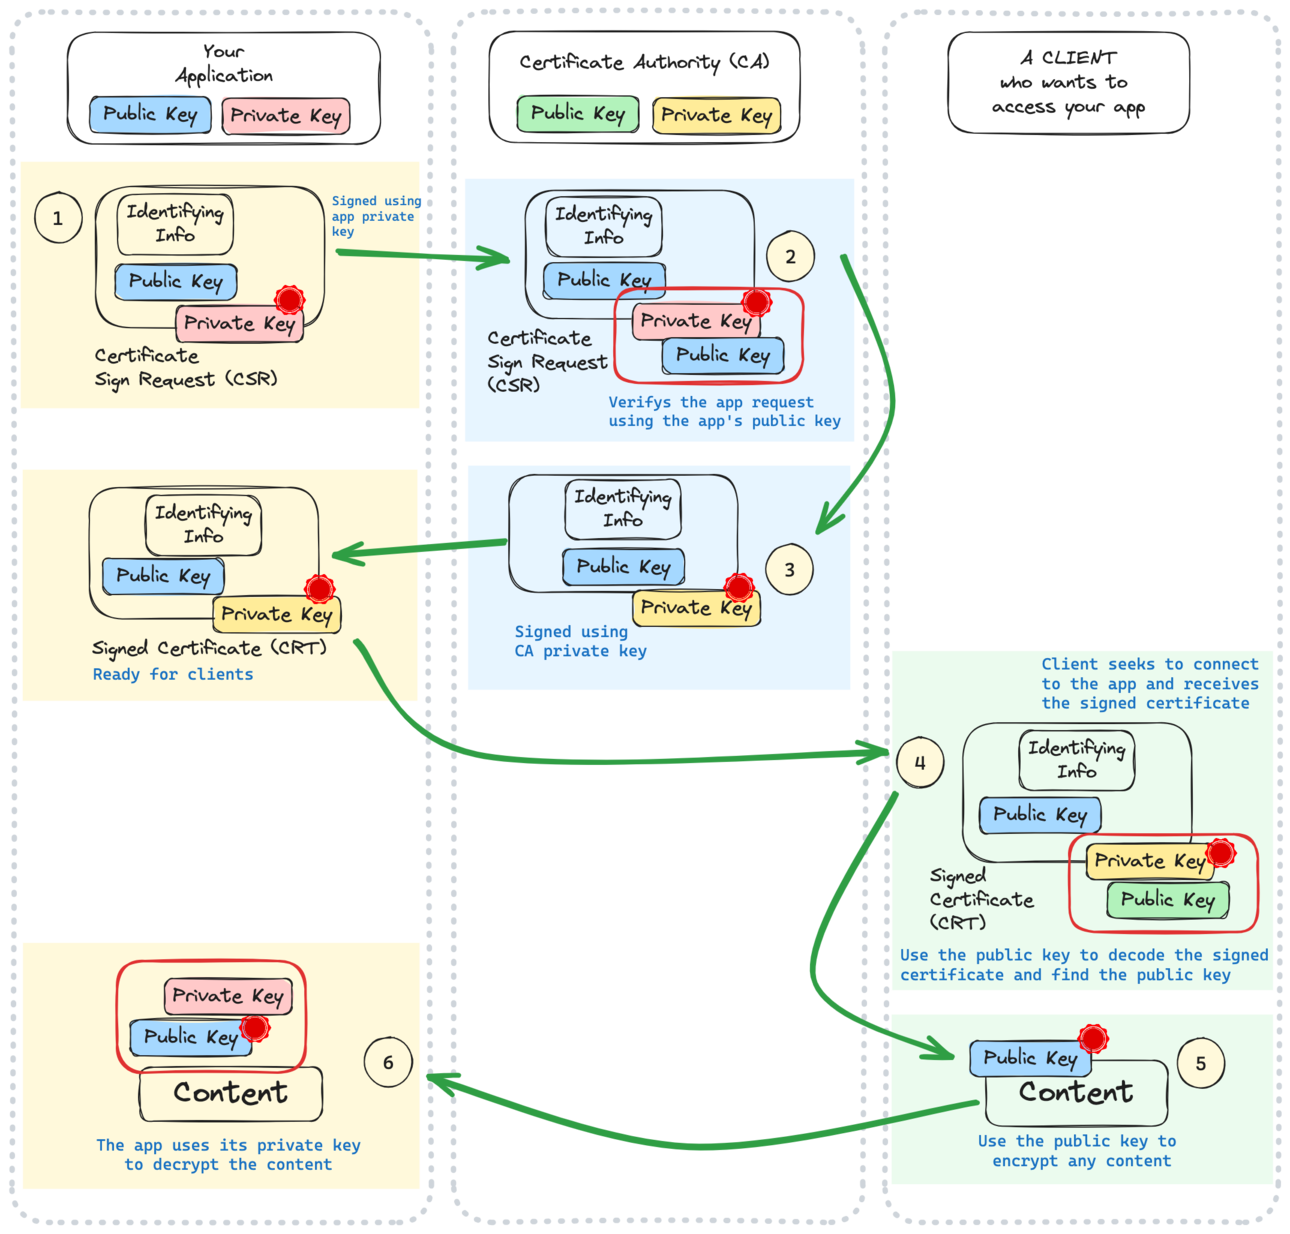
In this post, I will guide you through the concepts of certificates and keys. Following the explanation of these concepts, I will demonstrate how to generate self-signed certificates specifically for deployment purposes. The image below shoes a scenario in which your application requests a Signed Certificate (CRT) from a Certificate Authotity (CA) and then uses the certificate to prove its authenticity to clients.
Fundamental Concepts
Application Public/Private Keys
Every application needs a public and private key to encript and decrypt its communication. Let’s create a key pair first:
# Generate a private key
openssl genpkey -algorithm RSA -out app_private_key.pem

# The public key can be extracted from private key
openssl rsa -pubout -in app_private_key.pem -out app_public_key.pem
We have the public and private keys for the application. Now, corresponding to step 1, let’s create the Certificate Signing Request (.CSR). Please note that by providing the -addext field, you specify the domain and IP addresses that this request will be valid for.
# Generate the certificate sign request
openssl req -new -key app_private_key.pem -out app_csr.csr \
  -subj "/C=CA/ST=ON/L=Toronto/O=ExampleOrg/OU=IT/CN=example.org/emailAddress=hey@example.org" \
  -addext "subjectAltName=DNS:host.docker.internal,DNS:myapp.local,IP:172.18.0.1,IP:10.30.20.11"
You can also combine all of the above commands into a single one:
openssl req -nodes -newkey rsa:2048 -keyout app_private_key.pem -out app_csr.csr \
  -subj "/C=CA/ST=ON/L=Toronto/O=ExampleOrg/OU=IT/CN=example.org/emailAddress=hey@example.org" \
  -addext "subjectAltName=DNS:host.docker.internal,IP:10.30.20.18,IP:172.18.0.3"
In step 2, we need to send this request to a Certificate Authotiry (CA) to obtain a certificate. A CA is typically a trusted third party, such a the free service provided by certbot. However, we will set up a local self-configured CA for ths purpose of this guide.
CA Public/Private Keys
The CA uses the application’s public key to validate the signed request (step 2). It then employs its private key to encrypt the CSR message (step 3), resulting in the generation of the signed certificate (CRT).
In this process, the CA uses a CA certificate instead of simply using its private key to sign the CSR. The CA certificate helps associate information such as Country, State, Address, etc., of the CA and establishes the chain of trust.
# Generate the private key, the public key
# can be extracted from private key
openssl genpkey -algorithm RSA -out ca_private_key.pem

# Generate the Self-Signed CA certificate
openssl req -x509 -new -key ca_private_key.pem -days 365 -out ca_certificate.crt \
  -subj "/C=CA/ST=ON/L=Toronto/O=ExampleOrg/OU=IT/CN=example.org/emailAddress=hey@example.org"

# You can extract the public key from either the
# private key or the ca certificate
# You can extract more information such as adress from ca certificate
You can also combine all of the above commands into a single one:
openssl req -x509 -nodes -days 365 -newkey rsa:2048 \
  -keyout ca_private_key.pem -out ca_certificate.crt \
  -subj "/C=CA/ST=ON/L=Toronto/O=ExampleOrg/OU=IT/CN=example.org/emailAddress=hey@example.org"
Self-Signed Certificate
In step 3 we sign the certificate request and generate the signed certificate (step 4):
# Use CA certificate to sign the CSR
openssl x509 -req -in app_csr.csr \
  -CA ca_certificate.crt \
  -CAkey ca_private_key.pem \
  -CAcreateserial -out app_certificate.crt
Verification
When working with an application, you often deal with these three files:
tls.key: The private key of the application, corresponding toapp_private_key.pemabovetls.crt: The certification issued by the CA, corresponding toapp_certificate.crtaboveca.crt: The CA certificate, corresponding toca_certificate.crtabove
You can then verify the authenticity of the application certificate tls.crt using:
openssl verify -CAfile ca.crt tls.crt
# tls.crt: OK
There is another useful tool called mkcert, which simplifies the process even further:
# First, create a directory in which we'll create the certificates
mkdir -p certs

# Export the CAROOT env variable
export CAROOT=$(pwd)/certs

# Install a new CA
# the following command will create 2 files
# rootCA.pem and rootCA-key.pem
mkcert -install

# Generate SSL certificates
# Here, we're creating certificates valid for both
# "host.docker.internal" and "172.17.0.1"
mkcert -cert-file=$CAROOT/tls.crt \
  -key-file=$CAROOT/tls.key \
  host.docker.internal 172.17.0.1
That’s it!
Want to read more?
Check out these pages:- Kubebuilder Admission Webhook for Core Types
- Kubernetes Object Configuration with Kustomize
- Deploy a Local Kubernetes Webhook Server
- Linux iptables Reference Guide with Examples
- Configuring sFlow on Dell Switch with OS9
- Configuring WebDAV Access for Zotero on Ubuntu
- Dell Switch Configuration Commands
- Route Traffic through a Private Network using Dynamic Port Forwarding and Proxy SwitchyOmega
- Access to the SAVI using CLI
- Connect to Existing Running Desktop Session using x11vnc
- Install Ubuntu 20.04 via PXE UEFI Setup
- Access to the SAVI using Web Portal
- Run PyCharm IDE over SSH using Remote Host Interpreter
- Reverse SSH to Access Hosts Behind the NAT
- VNC Server in Ubuntu 16.04, 18.04 and CentOS 7
- Create an Overlay Network in Ubuntu using Open vSwitch (OVS)