Configuring WebDAV Access for Zotero on Ubuntu
Getting Started
More than two years ago I made the switch from Mendeley to Zotero due to its more user-friendly interface, open-source nature, versatile Plugin Support and WebDAV integration. And I love it. In this guide, We will walk you through the process of setting up WebDAV access for Zotero on an Ubuntu machine, allowing you to seamlessly sync and access your research library from anywhere with your Ubuntu machine. Zotero, a powerful open-source reference management tool, has become a favorite among researchers, academics, and students for its intuitive interface, extensive features, and excellent cross-platform support. By leveraging WebDAV, you can unlock a new level of accessibility, making your research workflow even more efficient.
Install the Apache Web Server on Ubuntu 20.04
This is a summary from this source. We assume you own the domain mydomain.com and will use zotero.mydomain.com to access your server.
sudo apt update
sudo apt install apache2

# You need to adjust the firewall rules and open ports 80 and 443
You can try accessing your web server by visiting https://zotero.mydomain.com. It is unsecure for now and we will use letsencrypt to secure it later. Once you ensure the web server is accessible then:
Set Up Virtual Hosts
sudo mkdir /var/www/zotero.mydomain.com
sudo chown -R $USER:$USER /var/www/zotero.mydomain.com
sudo chmod -R 755 /var/www/zotero.mydomain.com
echo "<h1>Nothing is here!</h1>" | sudo tee /var/www/zotero.mydomain.com/index.html
sudo nano /etc/apache2/sites-available/zotero.mydomain.com.conf
Then paste the following configuration in the zotero.mydomain.com.conf. We will create the required directories and credentials in the next step.
DavLockDB /usr/local/apache/var/DavLock

<VirtualHost *:443>
    ServerAdmin webmaster@localhost
    ServerName zotero.mydomain.com
    ServerAlias zotero.mydomain.com
    DocumentRoot /var/www/zotero.mydomain.com
    ErrorLog ${APACHE_LOG_DIR}/error.log
    CustomLog ${APACHE_LOG_DIR}/access.log combined

    Alias /zotero /var/www/zotero.mydomain.com
    <Directory /var/www/zotero.mydomain.com>
      DAV On
      AuthType Digest
      AuthName "zotero"
      AuthUserFile /usr/local/apache/var/users.password
      Require valid-user
    </Directory>
</VirtualHost>

<VirtualHost *:80>
    ServerName zotero.mydomain.com
    Redirect / https://zotero.mydomain.com
</VirtualHost>
Now before we proceed to enable the website, let’s config the WebDAV access and create required directories and credentials:
Configure WebDAV Access with Apache on Ubuntu 20.04
This is a summary of steps available here.
sudo a2enmod dav
sudo a2enmod dav_fs
sudo systemctl restart apache2

sudo mkdir /var/www/zotero
sudo chown www-data:www-data /var/www/zotero

sudo mkdir -p /usr/local/apache/var/
sudo chown www-data:www-data /usr/local/apache/var
Adding Authentication to WebDAV
sudo touch /usr/local/apache/var/users.password
sudo chown www-data:www-data /usr/local/apache/var/users.password

# In the following command the first "zotero" is the name of the folder /var/www/zotero
# and the second "zotero" is the username. You will be prompt to enter password then
sudo htdigest /usr/local/apache/var/users.password zotero zotero
Now let’s enable the authentication and the website:
sudo a2enmod auth_digest
sudo a2ensite zotero.mydomain.com.conf
sudo systemctl reload apache2
sudo systemctl restart apache2.service
Finally you will need to obtain SSL certificate for your website:
# Install certbot and then
sudo certbot
Config Zotero Application to use WebDAV
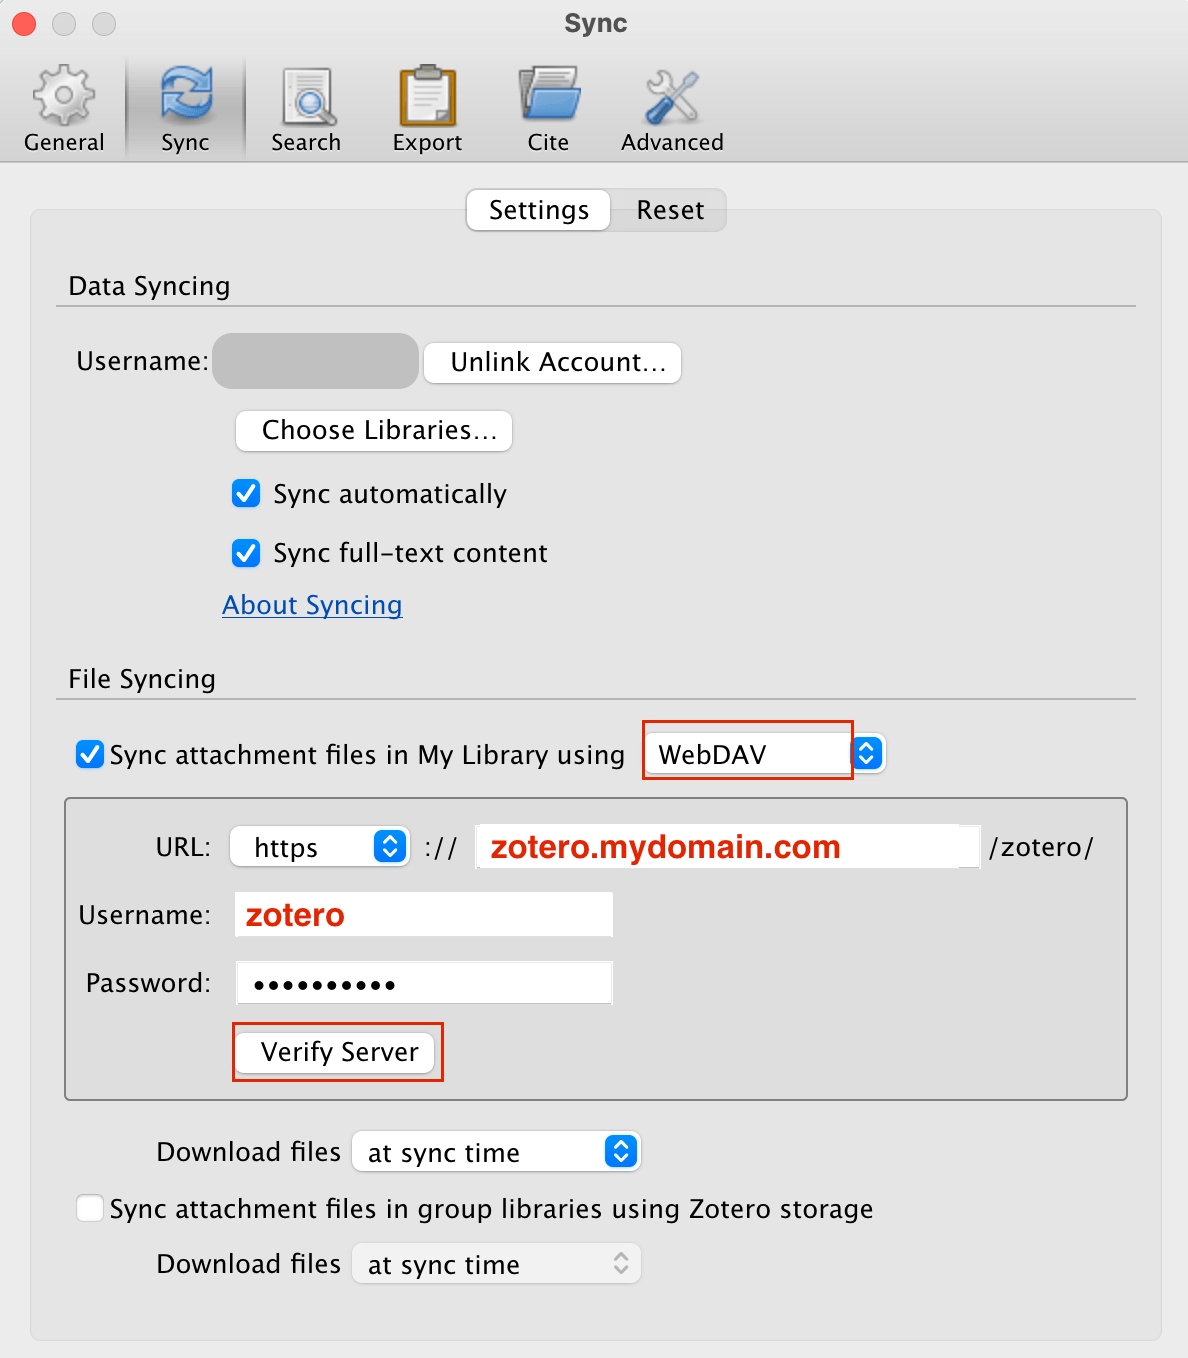
In Zotero, open settings and then go to the Sync tab:
Want to read more?
Check out these pages:- Kubebuilder Admission Webhook for Core Types
- Kubernetes Object Configuration with Kustomize
- A Guide to CA, CSR, CRT, and Keys (Digital Certificates)
- Deploy a Local Kubernetes Webhook Server
- Linux iptables Reference Guide with Examples
- Configuring sFlow on Dell Switch with OS9
- Dell Switch Configuration Commands
- Route Traffic through a Private Network using Dynamic Port Forwarding and Proxy SwitchyOmega
- Access to the SAVI using CLI
- Connect to Existing Running Desktop Session using x11vnc
- Install Ubuntu 20.04 via PXE UEFI Setup
- Access to the SAVI using Web Portal
- Run PyCharm IDE over SSH using Remote Host Interpreter
- Reverse SSH to Access Hosts Behind the NAT
- VNC Server in Ubuntu 16.04, 18.04 and CentOS 7
- Create an Overlay Network in Ubuntu using Open vSwitch (OVS)