Deploy a Local Kubernetes Webhook Server
This guide is based on the KubeBuilder version 3.13.0 and Kubernetes veriosn 1.27.1.
Introduction
When you write a custom controller and a webhook server for your Kubernetes cluster, frequent testing of the code becomes necessary. This requires preparing an environment where the code can be quickly executed.
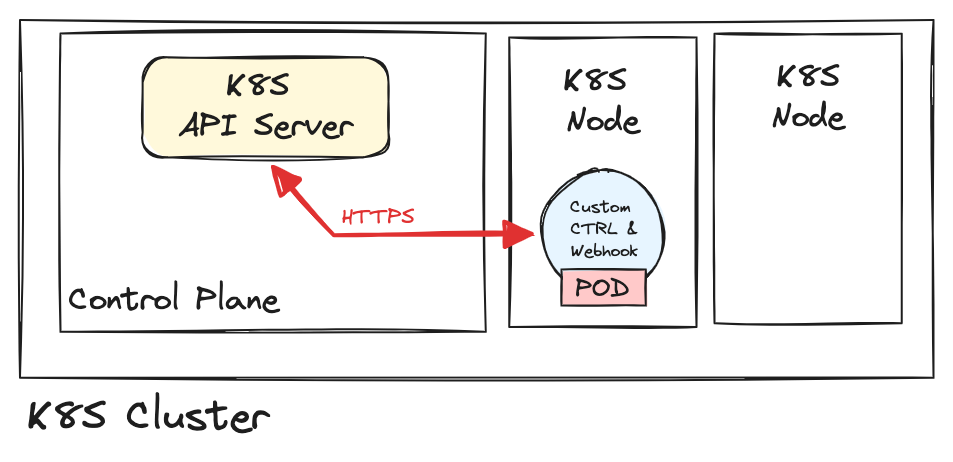
The general approach for custom controllers and webhook servers is to build the application and host the image in an image repository service, such as Docker Hub. Subsequently, the controller is deployed as a deployment in your cluster, encapsulating the logic within a pod.
Once the controller is up and running inside the cluster, the API server can communicate with the controller through defined services. For example, if you use Kubebuilder to write a custom controller, when you are ready to deploy the controller, you just need to perform the following steps:
# Build and push the image to the image repository
make docker-build docker-push IMG=<username>/<img-name>:<tag>

# Deploy the image in the current running cluster
make deploy IMG=etesami/skycluster:latest

# Undeploy
make undeploy
You can now see the logs of your controller by checking the logs of the pod:
# Watch the controller logs
kubectl logs pod <controller-pod-name> -f
Local Kubernetes Webhook Server
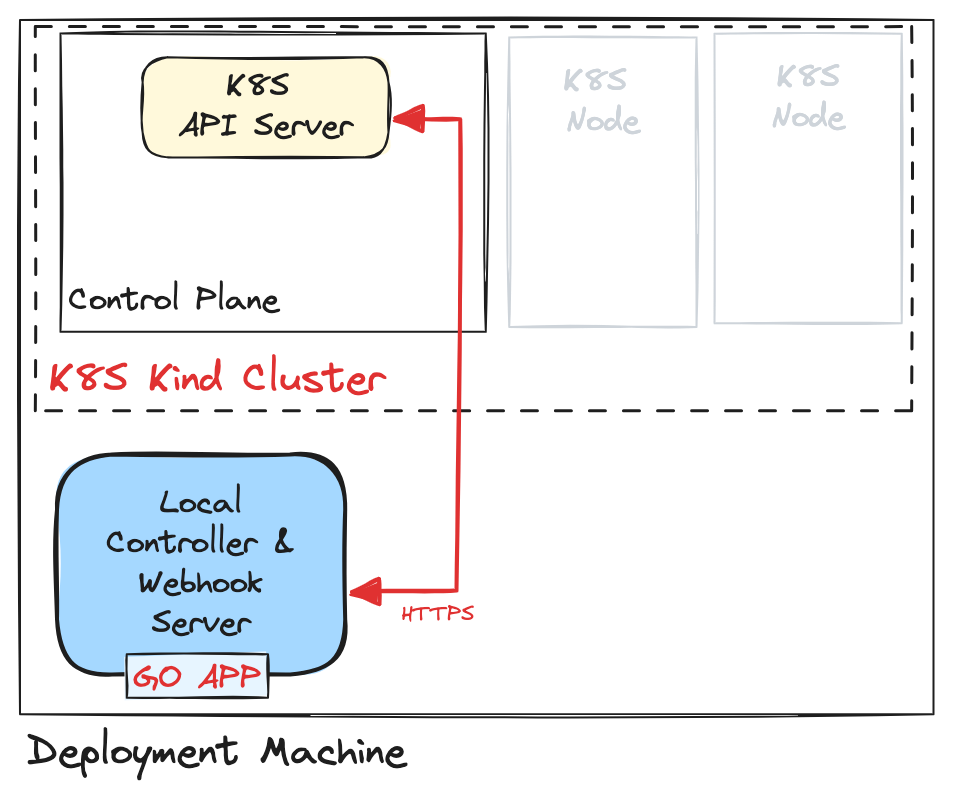
Building and pushing the image to the repository every time you make a small code change for testing can be time-consuming. Consequently, individuals may opt to run their code locally, which is a suitable approach for the controller logic. However, this approach introduces complexities when dealing with webhook servers.

The K8S API server communicates with the webhook server over HTTPS, requiring the preparation of certificates for the webhook server. Additionally, the API server needs to establish a connection to the webhook server. If the webhook server is not running inside a pod within a cluster, the traffic from the K8S API server to the webhook server needs to be managed.
The Kubebuilder official guide explains why running the webhook server locally is not straightforward:
If you want to run the webhooks locally, you’ll have to generate certificates for serving the webhooks, and place them in the right directory (
/tmp/k8s-webhook-server/serving-certs/tls.{crt,key}, by default).If you’re not running a local API server, you’ll also need to figure out how to proxy traffic from the remote cluster to your local webhook server.
In the following, I will explain how to deploy a webhook server locally and connect it to a Kind cluster. We use Kind to create a deployment cluster since the goal is to test the logic of the controller and the webhook server. Once the deployment is complete, the code should be packaged as an image, and the controller should run inside the cluster.
This guide assumes that you have already developed a webhook server using Kubebuilder, and the primary focus here is to run the server in a development environment.

Getting Started
Let’s create a Kind cluster first:
# create a kind cluster
kind create cluster --name cluster1

# Check the cluster
kubectl config get-contexts
kubectl config use-context kind-cluster1
Generate Certificates
You can take a look at the Digital Certificate’s Guide post for more information about certificates and CA. Here, we use mkcert for this purpose:
# First, create a directory in which we'll create the certificates
mkdir -p certs

# Export the CAROOT env variable
export CAROOT=$(pwd)/certs

# Install a new CA
# the following command will create 2 files
# rootCA.pem and rootCA-key.pem
mkcert -install

# Generate SSL certificates
# Here, we're creating certificates valid for both
# "host.docker.internal" and "172.17.0.1"
mkcert -cert-file=$CAROOT/tls.crt \
  -key-file=$CAROOT/tls.key \
  host.docker.internal 172.17.0.1

cat certs/rootCA.pem | base64 -w 0 > caBundle.key
Once you have the key and certificate files, place them inside the following path on the deployment machine: /tmp/k8s-webhook-server/serving-certs/tls.{crt,key} according to the official Kubebuilder guide.
Setup YAML Files
You need to modify your CustomResourceDefinition and MutatingWebhookConfiguration definitions. In fact, these two Kubernetes objects are the only ones required to set up your local deployment controller and webhook server. If you use Kustomize, you can generate the YAML file that includes all definitions for your cluster using Kubebuilder:
kustomize build config/default > config/output.yaml
Check the yaml file and within the CustomResourceDefinition, for each webhook entry, replace the service configuration with only the url and add the caBundle field (look at the example below). We link directly to the webhook server as it is running outside of the cluster, and there is no need for any services anymore. You need to provide the content of caBundle.key as the value for caBundle:
# omitted for brevity
webhook:
  clientConfig:
    caBundle: LS0tLS1CRUdJTiBDRVJUSUZJQ0FURS0tL...
    url: https://172.17.0.1:9443/convert
# omitted for brevity
# omitted for brevity
webhooK:
  clientConfig:
    caBundle: LS0tLS1CRUdJTiBDRVJUSUZJQ0FURS0tL...
    url: https://172.17.0.1:9443/mutate-group-version-type
The IP address 172.17.0.1 corresponds to the Docker interface attached to the local deployment machine. Thanks to Kind and Docker, this address is reachable within the Kubernetes cluster. If it wasn’t reachable, we would have to define Service and EndpointSlice objects to proxy the traffic to the deployment machine and the local webhook server.
The same principle applies to the MutatingWebhookConfiguration and ValidatingWebhookConfiguration files, assuming you have set up mutating and validating webhooks. For examples for MutatingWebhookConfiguration:
# omitted for brevity
webhooks:
- admissionReviewVersions:
  - v1
  clientConfig:
    caBundle: LS0tLS1CRUdJTiBDRVJUSUZJQ0FURS0tLS0t...
    url: https://172.17.0.1:9443/mutate-group-version-type
# omitted for brevity
That’s it! If you now try to run your controller and the webhook server, the API server should be able to contact the them.
# Run the controller and webhook server locally
make run
And you can verify if the webhook server is up using curl:
curl --insecure https://172.17.0.1:9443/mutate-group-version-type
Want to read more?
Check out these pages:- Kubebuilder Admission Webhook for Core Types
- Kubernetes Object Configuration with Kustomize
- A Guide to CA, CSR, CRT, and Keys (Digital Certificates)
- Linux iptables Reference Guide with Examples
- Configuring sFlow on Dell Switch with OS9
- Configuring WebDAV Access for Zotero on Ubuntu
- Dell Switch Configuration Commands
- Route Traffic through a Private Network using Dynamic Port Forwarding and Proxy SwitchyOmega
- Access to the SAVI using CLI
- Connect to Existing Running Desktop Session using x11vnc
- Install Ubuntu 20.04 via PXE UEFI Setup
- Access to the SAVI using Web Portal
- Run PyCharm IDE over SSH using Remote Host Interpreter
- Reverse SSH to Access Hosts Behind the NAT
- VNC Server in Ubuntu 16.04, 18.04 and CentOS 7
- Create an Overlay Network in Ubuntu using Open vSwitch (OVS)